Welcome to Big Horn Mountain Creations and Quilting......Quilt Stylist

Welcome to Big Horn Mountain Creations, Quilting and Embroidery.
Custom quilts and embroidery, also longarm quilting service. No two quilts alike, made especially for you. Feel free to contact me if you want a special work of art for yourself.
Grab a cuppa and enjoy the quilts.

Wednesday, February 02, 2011

Rocky Mt. Elk Foundation Quilt

 Rocky Mountain Elk Foundation Quilt

I have been asked to make a quilt for

I will be using commemorative shirts to construct the quilt.
This quilt is being donated to the foundation
by several local families.
It will be auctioned off at one of their affairs in March.


 On Tuesday February 1,
I was given this stack of shirts to use 
in constructing the quilt.
Beautiful shirts.
With great graphic logos

 The deadline for this quilt is February 28
It is a queen size quilt.
So I began cutting apart the shirts, 
starting at about noon and stopped to take
inventory about 6 pm (with a few little breaks inbetween).
 Above are the shirt backs with logos

 Shirt backs without logos, but will be used for fabric.

 Shirt sleeves

 Extras with possibilities

 Shirt fronts with logos

After dinner (thank goodness for left overs).
I decided I needed some direction so I 
cut out shapes for the large motifs (like you'd do for funiture
when your decorating a room)
Once I found a pleasing arrangement
I taped them down.
Next I put in the outer border
and began filling in the center.
There will be two borders
the outer most I am thinking will be black and 3 inches wide
Next will be a 6 inch border, 
it will house numerous items from the shirts.
 This morning (Wed), more cutting, 
prepare the element for the top
Large motifs cut to size

 Smaller motifs cut and sewing has begun.


 A star from a shirt front and strips from a shirt
Star fabric with strips.  
These are 6 inch blocks, the 4 together makes a 12 inch 
component for the quilt
 More small motifs awaiting placement
 These 6 inch squares were shoulder pads on the shirts
they are awaiting placement.
 Another component which will be going into the border are the
yokes from the shirts.
That is it for today's post.
I am beginning to cut the fabric into 3 1/2 inch strips
so I can begin making 6 inch four patches for fill blocks
then I can begin constructing the top.

Now I think it is time to shop for some fabric for the
back of the quilt.

Until next time
May God Bless you and keep you.

Wednesday, January 26, 2011

Ruffled Roses BOM - 2


Ruffled Roses
Block of the Month by Sue Graman & TQS  (The Quilt Show)

Update on my BOM
I have been working on getting all of the applique
secure.
Even though I did fuse the design down it doesn't stay.
So I machine appliqued the stems and leaves down,
this style of applique is call...Raw Edge Applique
because you leave the raw edge showing.  
I am trying to decide how I will quilt this on the longarm.
I was going to machine stitch the flowers also, but did not like the outcome.
Being a Crazy Quilter I decided to
 secure the flowers
with a blanket stitch, using 3 strands of embroidery floss.
Also the heart.
And the little berries, with french knots in the middle, 33 of them.
Next step is to add the setting triangles.  

The next set of instructions begin Feb 1.
I am try to keep on track.

Thank you for coming over,
I hope you will follow the progress of this 
beautiful quilt.

God's Blessing to you.

Monday, January 17, 2011

Block of the Month - TQS

 One of the things I want to do this year is this BOM
it is from TQS ,  The Quilt Show  with Alex Anderson and Ricky Tims.
it is designed by Sue Garman

Isn't it beautiful?
I have seen alot of wonderful BOM but
never one that made me act.
If your a member of TQS it would be fun to see you do this
also, to see how yours would be different from mine.
 If your not a member, you might like to follow my progress.
This is January's block which you can see is the center block
Sue has done hers in needle turn applique, but
I decided to do mine in raw edge, fusible applique.
I decided to take all the fabrics from my stash, and I was able to,
the only thing I will need to buy is the backing, but that is a ways off so I can 
probably save up for it by next January.

I finished putting all the little red berries on tonight.
My setting triangles will be a creamy beige.

This one is by Margo Clabo, all in Pinks and greens.

So follow along won't you.     Have a blessed week.

Thursday, January 13, 2011

 Over at  Among the Gum Trees  

An appeal has been issued to help crafters in  Australia who have lost everything in the horrible floods that are going on  over there.

I thought you all might be interested in helping and maybe did not know about this chance.   I did not know until today when it was passed on to me by a friend.

So read about it below and see how you might help.

For all links and to contact Jenny go to

Among The Gum Trees

****************************************************************

Tuesday, January 11, 2011

We need your help!!!

A large part of our country is under water...the devastating floods have destroyed town upon town, and there is no end in sight for the next month or more. The water is still flooding towns as it makes its way down the country, and more rain is till bucketing down. This is indeed "Queensland's darkest hour" as our state Premier has described it.
The inland tsunami that hit Toowoomba yesterday has left the nation reeling, but no more than the people of Toowoomba with the deaths of children and still over 70 people missing. 
The list of towns affected is long. The area of flooding is larger than Texas.

The Gum Tree Designers are asking for your help.

There will be many hundreds of crafters who have lost what is their joy, their hobby. 
In our own small way we want to help, and we need you to come along side with us.

We want to collect, and then distribute, a 'New Beginnings' sewing kit for those who need to start over with their craft. We will be posting the kits in bulk to the various quilting groups in each town.


This is what we'd like in each kit:

1. A handmade sewing caddy, complete with needlebook and pincushion.
2. A pack of embroidery scissors with a scissor keep.
3. Six individual skeins of stranded embroidery threads.
4. Embroidery needles.
5. 1 fat quarter of fabric.
If you can help, please email Jenny at -
 jennyofelefantz AT yahoo DOT com DOT au 
OR
purpleflowerpatch AT gmail DOT com
for the address in Australia to post these kits to. 

PLEASE post by the first week of February.

Fee is going to make some drawstring bags to put the kits in, but if you can put your kit inside one you have made that will be even better. 
Please share this appeal on your blogs and link back to this post! 
Some free online patterns for sewing caddies can be found at  -
Helen's blog HERE 
About.com HERE
Maureen's blog HERE
Marcus Brothers HERE...

If you know of more free caddy patterns online, please leave a comment with the link and we'll add it to the list.
~~~~~

Jenny is also auctioning two of her original handmade Shabby Roses quilts to raise funds for the Flood Appeal. You can see the details HERE on her blog.

Joy is auctioning a kit for one of her beautiful patterns HERE.

Fee is auctioning a pretty fat quarter bundle of Sugar Pop HERE.

Our recently retired Gum Tree Designer, Vikki, is also auctioning a set of 'Springtime' patterns HERE.

We will keep you posted on other ways we intend helping as the weeks progress. The effects of the flooding as it continues to rage on will be felt for a long time to come, as it is not looking like ending for many weeks, perhaps months. 
Your help is appreciated more than you know.

We are also asking for donations to raise the funds for the postage costs to all the quilt groups, so if you can help out with that we are most appreciative! We have put a DONATE button on our sidebar for easy Paypal payments. 
Any money remaining after postage will be given to the Queensland Government Flood Appeal. 
 'll set up a button in our sidebar later this week to contribute. 

Thanks,
the Gum Tree Designers
xxx

Saturday, December 18, 2010

Finished Slippers..........

Finished slipper collection.
Warm footsies in the future.
Once I figured out how I wanted these to look
they went fast and I did the last 3 pair in an afternoon.  
For a tutorial, see my last post.


Friday, November 12, 2010

Slippers for Christmas

 Awhile back I shared some slippers I made for my youngest grandson
just the beginning of making a pair for each of the kids

 To cute aren't they.
This is the pattern I used to make these cute little slippers
you can find it on Keepsake Quilting.com

I also found this pattern over at the Pink Slipper Project
Have you heard of this great site.  They organize and collect slippers to give to 
displaced women and their children.
Aren't these slippers just darling.
I used both patterns to inspire me.  I did not want the raw edges or the binding,
  so this is what I did.

After making a test pair I lengthen the 
sole by 1/2 inch and widened the heal by 1/2 inch on each side.

Here are the main pattern pieces, just two
the sole and the toe.

Place the sole pattern on the fleece, cut 4 pieces, and cut 2 pieces of batting.
I am using cotton batting

Cut 4 of the toe pattern, I am using flannel, and again 2 cotton batting.
I tried using fleece for the toe also but it is just to thick for my liking and for the machine to sew.
Oh the machine will sew it but it is hard on it, not worth it, besides I like how this looks better.

One pair cut.  
Note: you can use scissors if you don't have a rotary cutter, 
the rotary cutter will save you quilt a bit of time and is easier on the hands.
To assemble start with the toe.  
Place the batting on mat, top with one piece of the 
flannel wrong side against the batting,
top with the other piece of flannel right sides together.

It is helpful to have a walking foot to work with this many layers.
What the walking foot does is feed the top and bottom fabric evenly
because the walking foot has feed dogs, too.
You can do it without, though it may be a bit more difficult.
Sew the 3 layers of the toe together at the top, about 1/2 inch from the crescent shaped edge
Clip the curve, it helps when you turn it to have a smooth edge....
turn so that both right sides enclose the batting.
Next sew a 1/4 inch from the new finished edge to top stitch.
Also sew down the raw edges, just to make it easier when attaching the toe to the sole.
Trim of the little wings (above)
Now it is time to join the toe and sole.

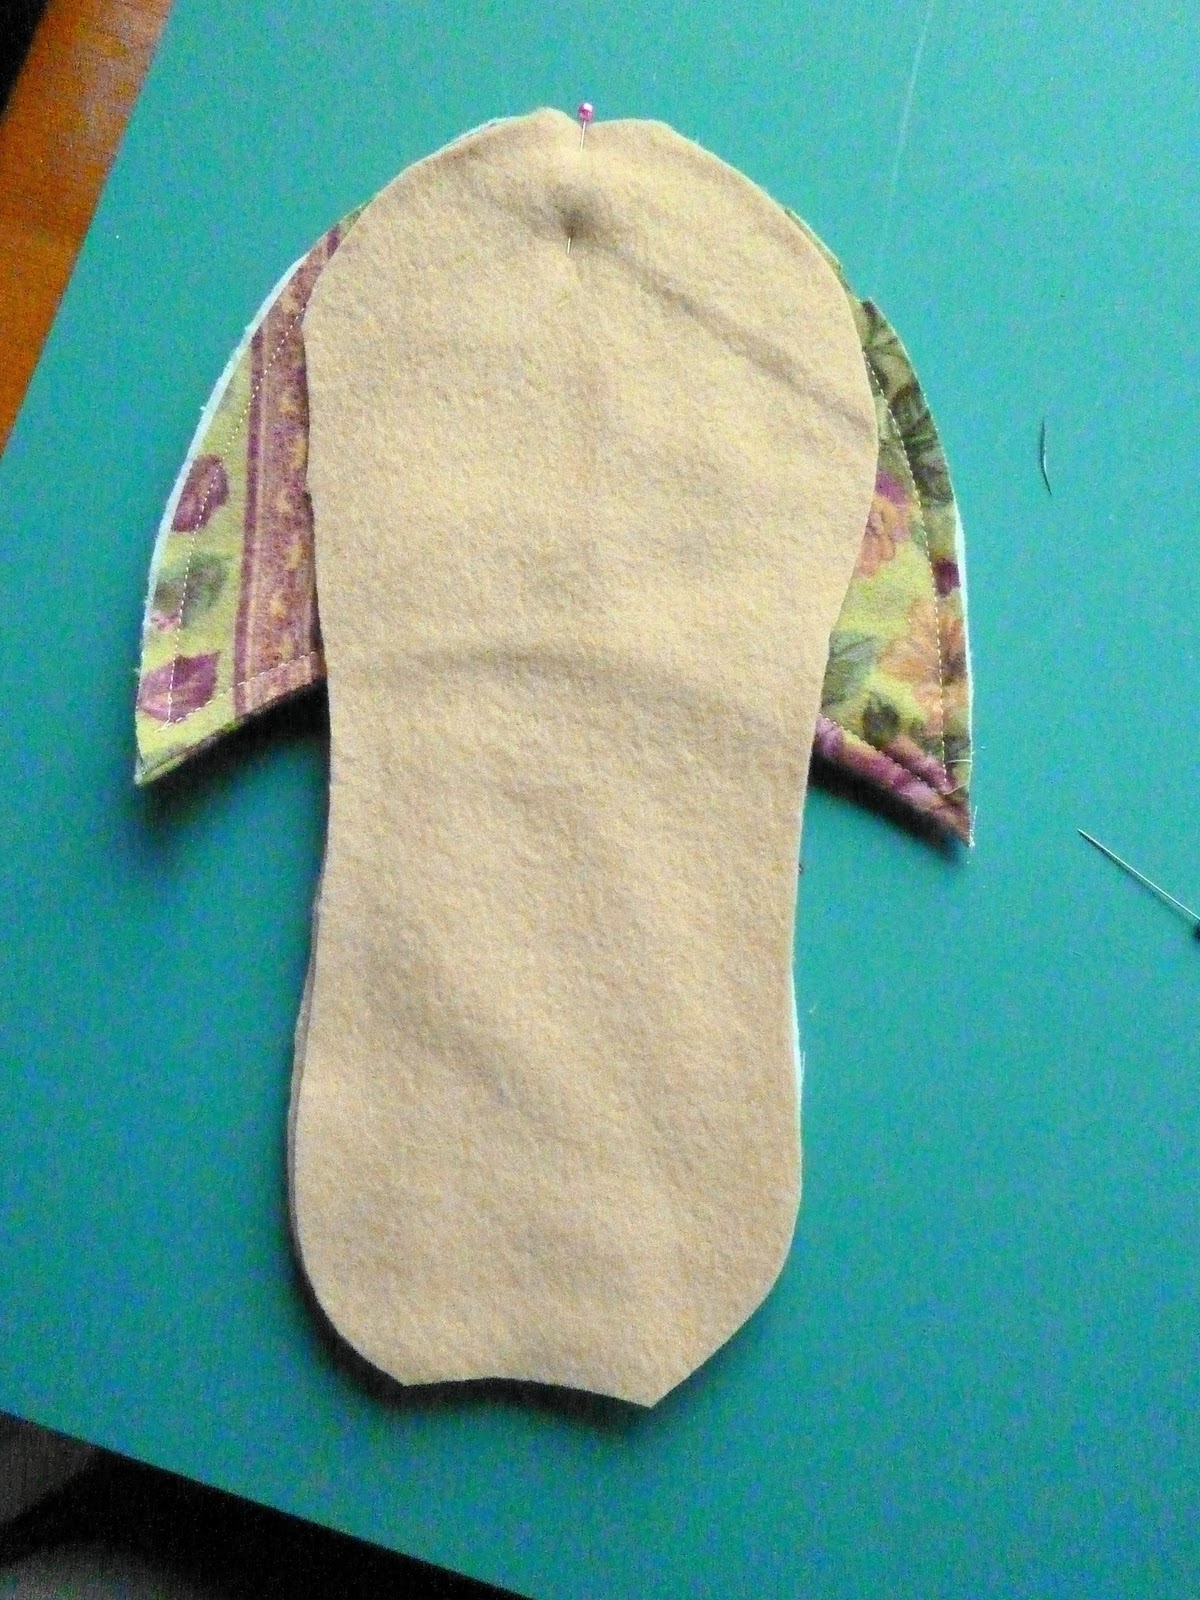
Place the batting down first, then one of the fleece sole pieces
next the toe piece, and top with another fleece sole.
it will look like this (below), begin to pin all layers together
pin around one side to the heal, tucking and aligning the edges
as you go around the other side aligning the edge of the toe to the edge of the sole
you will need to tuck the center (like so) in order to bring to sole piece over to pin.
making sure to keep the end of the toe against the edge.
Leave an opening along one side like this, about 4 or so inches long so that you 
can turn the the slipper right side out.
like this.
Slipper turned and opening pinned to be hand sewn.

The pair.
Perhaps the addition of a bow?
Another pair.

The next pair will have orange flames.

I hope you have enjoyed the tutorial and will give making slippers a try.
They do not take very long, about an hour if your not taking
pictures.

May God Bless you richly

Friday, October 29, 2010

Marianne's Quilt - Part 7- the Finished Quilt

Here we have Marianne's finished quilt.
It turned out beautifully and as I write this,
the quilt is winging its way to it's new home.
 
This first picture is the completed quilt.
(It is laying across my bed so you are also seeing my log cabin underneath.) 
the front and the back
close up of the long arm quilting work
here you can see the color of the thread
one of the corners, with the binding, another look at the quilting design.
Yes, this is the same corner, but I wanted you to see the pink thread.  
(Remember you can click on the pictures to enlarge them.)
quilt back
close up of the quilting from the back side
The label

again the whole quilt.

I hope you have enjoyed the journey of making this quilt for Marianne.
It has been fun sharing it with you all.
Please join me as I make my daughters quilt.

May God bless you richly.