Welcome to Big Horn Mountain Creations and Quilting......Quilt Stylist

Welcome to Big Horn Mountain Creations, Quilting and Embroidery.
Custom quilts and embroidery, also longarm quilting service. No two quilts alike, made especially for you. Feel free to contact me if you want a special work of art for yourself.
Grab a cuppa and enjoy the quilts.

Monday, April 22, 2013

Pink and White

Yes, it has been a long time.
Yes, I am still quilting.
Yes, I have things to share.
Yes, I will get on to sharing.

This sweet little quilt is one I did for a friends daughter.
I love the color and the quilting.

Friday, February 24, 2012

Things Are Out of Control

THINGS ARE OUT OF CONTROL
AGAIN!

No matter how hard one tries to stop it,
fabric multiplies, and multiplies.
It is everywhere!
Then you cut some for a project,
now you have little bits 
and the big question then is do I save it
or not, can I use it for something else?
So then what was sort of neat
is no more.

So it is time to clean up again.

Now I do share my sewing area with my bedroom
we are still working on the studio upstairs.
I hate to move all this up there just yet.
But I may just do it so maybe 
I can have a neater bedroom.  


Before
Pretty scary..isn't it?
I will show you after......after I get it cleaned up.

So stay tuned

I am linking to Fabric Storage Tip and Share your Stash
over at  Quilting Gallery.com
go on over and check out the ideas.

Saturday, December 31, 2011

Shoe Box Swap

HI

I know it has been a long time since I have posted any quilty things.
so I am back to share some things I have been working on.

But first

I join a group for a 
SHOE BOX SWAP,
the idea is to fill a shoe box with
goodies.  Requirements are 2 fat quarters
for each month of the year and either a hand made
ornament or pincushion.

Each person fills out a questionnaire with 2 colors
and choice of the ornament or pincushion.

My secret shoe box santa is Fran R.  
and she out did herself.
Can you believe she fit ALL of this in a shoe box!

Hand made this darling needle book and ornament for me.
She really does beautiful work

Look at these FQ bundles, oh my goodness
(my colors were pink and green)
Neat pillow pattern.

Some wool, it is soooooooo soft
ribbons, threads, book about quilts, 
a motif, magnetic needle case, silk fabric
(we do CQ, too)
candy, which was a huge hit!
Everything again.

Thank you Fran, I love my box of goodies

Happy New Year to All


Monday, July 25, 2011

Turquoise & Brown Split 9 Patch - Completed

Turquoise & Brown Split 9 Patch 
 
The completed quilt.
I waited to post the final product until
after giving the quilt to my daughter.
 
The label
Whole completed quilt
Quilting details

Binding details
Front and Backing
I am pleased with the results, despite the quilting issues.
It now lives in OK, with DD and SIL

Enjoy kiddos

What is next?
Finish BOM (block of the month) 'Ruffled Roses'
Quilts for my friends, Amber and Tyler's, 4 wee ones.
(one of which is started, a cute pink and white)
Beautiful quilt kit that is waiting.
Quilt Judy's bear quilt
Learn thread painting
Whole cloth quilt
Wall quilts for my newly finished stairwell
(which leads to my studio)

So you see, I will keep busy and have more to share with you,
I hope you will come back for a visit 
Please let me know you were here by leaving a comment.

Hugs
&
May God Bless and Keep You.

Wednesday, July 13, 2011

Ginny's Flanged Binding

Ginny's Flanged Binding
 
I thought I would do a tutorial on
a machine binding technique that I learned
from Ginny Singer while at a quilt show.
She had done her quilts this way
and shared with me how she did it.
I changed it up just a little bit, but it is still
her idea.
I have never been happy with the results of machine
binding until this technique.
 
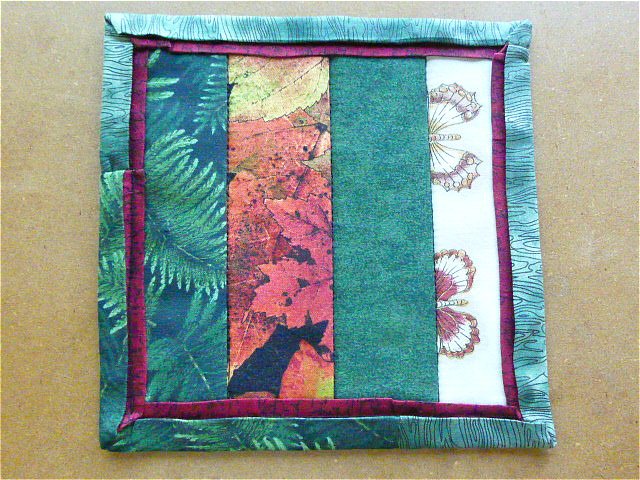
First I wanted to share a picture of my first attempt
at this way of doing the binding.
This is on my daughters quilt.

Alright, lets cut our binding.  I used 2 1/2 inches, prepare
the length as you normally would.  I did not do bias here, just 
cut across the fabric.
Next cut a 1 inch strip the same length as your binding
piece it together as you desire.
Spray your binding with spray starch to help get a crisp fold.
Press in half length wise both pieces.
Be careful not to stretch the fabric which is easy to do.
Now open the 2 1/2 inch binding up, laying it flat.
Place your accent piece (flap) on top, so that the pressed
fold of the large strip in centered down the middle of the 
flap, stitch that on about 1/8 inch from the raw edge.

It should look like this.....
with a little space between the fold line and the stitching to create 
a small flap, that will help hide the stitch line when you sew it down.
Now, fold your binding in 3rds, like this using the stitched line
of your flap to aline the back side.  You do not need to do the 
whole thing this is to get an idea of how wide you will stitch the binding on.

When you open it back up, place it under your presser foot
lower the needle and this will tell you how far in you stitch line needs
to be. See how mine is on the outside of my 1/4 inch foot?
Use this measurement to sew on the whole binding.  
Trim away any excess binding you may have.

Apply the binding just as you normally would.
Except....sew it to the back, not the front
To connect the two ends,  I do the bypass/overlap method.
trim away excess layers where needed.

Pull the binding to the front of the quilt
 I suggest pinning, like this......
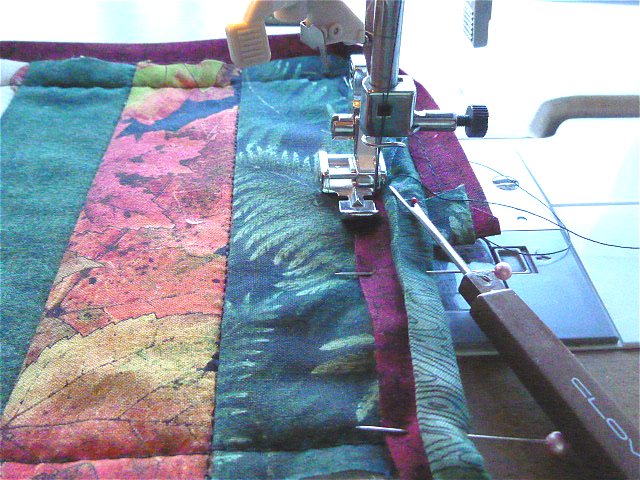
So you can put your zipper foot on and move the flap aside,
sewing up close and letting the flap go back over the stitching.
The seam ripper helps hold the flap out of the way.
The corners are done the same as normal, but you will 
need to stop and cut your thread, then start again on the 
new side. 
Try not to sew past the line of stitching that attaches the binding
or you will sew into the binding on the back
this is the back view, can you see where I over sewed my line?
Here is the binding on my daughters quilt, it was much easier 
to work with then the small sample.  It does take some
tweaking on these corners but the result is worth it.
A close up of the stitching on the front and under the flap.
I hope my explanation is clear, if not let me know if
I can answer any questions.
Give this a try and let me know if you have 
any ideas to make it better.
Thank you Ginny for sharing this with us.

May God Bless and Keep You!

Friday, June 10, 2011

Ruffled Roses BOM - 4

Ruffled Roses BOM  
part 4

Oh yes, I am behind, that is for sure.
I am still working on part 3 or Marches borders
for my Ruffled Roses quilt.

Things got off track back in Feb and here it is
June and I am still working on March, but alas I AM still working on it.

For March we are to add the swagged border.
Wow, alot of work but I am nearly done, and ready to move
onto the next task or Aprils border.
Here is a picture of how how the quilt should look
of course with our own fabrics

Some of the details........

these are the corner blocks, sewing down the applique.
I really love it when a mistake turns out to be a better way
of doing something.  I started sewing the applique down 
backwards, well the stitching that holds it down that is.
Turns out I liked it better so continued to do it wrong
the picture shows it wrong  er now what is right.
All 4 corner blocks, can you see which one is wrong (that used to be right)?
One of the swag borders
And now attached to the quilt.  All of the flowers are being hand
stitched down with a blanket stitch just like the center was done.
The whole quilt top so far.  I am loving it, was a little scared of the
strip, but an really glad I chose to go with it.
That stripped fabric is one of those that I use alot in different projects.
Stay tuned for Aprils work.

I am hooking up to Pink Saturday 
so come on over to How Sweet the Sound  
so many sweet pinks to see.
Thank you Beverly for hosting Pink Saturday for 3 whole years now.

May God Bless and Keep you
please leave me a note, I love to hear from you.

Friday, May 20, 2011

Turquoise & Brown Split 9 Patch-Quilting


 Working on quilting Samantha's 
Turquoise & Brown Split 9 Patch


 Finished top

 Mounted to the longarm and ready to go

Quilting begins, this quilting pattern is on I love to do
and have not seen anywhere else. 

To see the process of making the top, 
check out my earlier post  HERE

Thank you for stopping by, hope you are having
sunshine at your place, it just won't stop raining here.

Off now to quilt the rest of this quilt.

God Bless