Welcome to Big Horn Mountain Creations and Quilting......Quilt Stylist

Welcome to Big Horn Mountain Creations, Quilting and Embroidery.
Custom quilts and embroidery, also longarm quilting service. No two quilts alike, made especially for you. Feel free to contact me if you want a special work of art for yourself.
Grab a cuppa and enjoy the quilts.
Showing posts with label Process Pledge Post. Show all posts

Friday, October 29, 2010

Marianne's Quilt - Part 7- the Finished Quilt

Here we have Marianne's finished quilt.
It turned out beautifully and as I write this,
the quilt is winging its way to it's new home.
 
This first picture is the completed quilt.
(It is laying across my bed so you are also seeing my log cabin underneath.) 
the front and the back
close up of the long arm quilting work
here you can see the color of the thread
one of the corners, with the binding, another look at the quilting design.
Yes, this is the same corner, but I wanted you to see the pink thread.  
(Remember you can click on the pictures to enlarge them.)
quilt back
close up of the quilting from the back side
The label

again the whole quilt.

I hope you have enjoyed the journey of making this quilt for Marianne.
It has been fun sharing it with you all.
Please join me as I make my daughters quilt.

May God bless you richly.

Wednesday, October 20, 2010

Split Nine Patch Quilt

Split Nine Patch Quilt

I am starting a new quilt.....well really I started it some time ago
this quilt is for my daughter and her hubby.
I had Samantha pick a pattern for this quilt and the colors to be used
  
The name of the pattern is Split Nine Patch 
you can find this pattern at 
the Quilters Cashe   here
this site is full of wonderful blocks for your use.

The color way for this quilt is, greens and browns.

I will be going through the process of making the quilt 

To begin
The pattern and alot of notes
I numbered the different patches and then numbered the fabric

The fabric, as you can see I began cutting the patches
 Cutting and sewing patch #6

 100 of patch #6 sewn together and separated into stacks of 10 each
 Sewing the remaining 32 patches of  #6

 The Thread  this is the thread that I will use to do the quilting 
it is Master Piece by Alex Anderson, Superior Threads
color #133  Meadow
it is a #50 Extra long staple Egyptian Cotton
Ok, that is it for this first installment of the Split Nine Patch Quilt
I hope you will come back and follow the process

God Bless

Saturday, October 16, 2010

Marianne's Quilt - Part 7

Part 7
Quilting.

A peek at what is happening on the longarm
a couple of close ups


One of the corners, notice the leaf design in the dark blue outside border.
and an all over feather design for the center.
Ok, back to work on the long arm, we are getting there Marianne.  

May God bless your day.

Monday, October 04, 2010

Marianne's Quilt - Part 6

Welcome to Part 6 of Mariann's quilt progress.
The quilt is on the longarm and quilting will start tomorrow morning
I tried to take a straight on picture, 
it is to close, so it looks like the quilt dips on the sides,
BUT
surprise, it doesn't.

As you look at this next picture you can see the bed of the longarm machine
I won't go through the steps of loading the quilt
each machine is different.
I will tell you that the backing is rolled onto the two rollers.
Then, I 'float' the batting and top.  Floating, just means
that the top and batting are not rolled onto rollers, but
layered on top of the backing and they just 'float' there.
Of course once I start sewing...er, quilting....the layers will then become one.
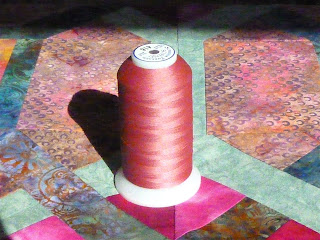
Here is the thread I will be using.
"So Fine", by Superior Threads
Rose Petal # 416
isn't it pretty, I fell in love with it right away.
So, tomorrow I will begin quilting and will take pictures so you can see that process.

Thank you so much for stopping by.

God's blessings to you and yours.


Friday, September 24, 2010

Marianne's Quilt - Part 4

Welcome to part 4 of creating Marianne's quilt.

Remember last time all the problems I was having with the corner blocks?
I can tell you the confusion does not go away,  sigh. 
Let me show you why.
The pieces below are for the right side,  top and bottom blocks
See how the fabric on either side of the blue strip are the same?
after cutting these in half, we put one from each on either side of the light blue strip.
That is pretty straight forward, no big deal.....
BUT
We have to do the blocks for the left side now.  One would think, easy peasy, right?
Just change the dark blue and lt blue around and ya got it.......
Think again, 
the dark solid pink has to go toward the center of the main block. 
See my last post.
Soooooooooo, there are some differences in how to piece them together.
Instead of the same color on either side of the center strip, 
for this one you have to put one of each on either side.
(See the picture)

Now someone with a more organized brain might not have a problem with it
and I did ok, as long as I did not take a break.  LOL.
After cutting this in half, as the ruler shows, then you can put it onto a dark strip.
and you get this.
I know, I know!  How can it possibly make a difference?  Trust me it does
I can not explain why, all I know is it does.
Now this block can be turned so the dark pink goes into the center.
(it is backwards in the picture)
Go look at my last post again to see how they set.
Are you confused?  

I am happy to say that I made it through and got them all right
(although my seam ripper got a really good workout).
I am also happy to say, the quilt is ready to go on the longarm machine for quilting.

I have more 'process' to show you, but felt this was enough for one setting,
especially if your head is spinning like mine was is  (it still makes my brain twist in knots).

I hope Marianne is going to love this quilt, 
I know I do, despite all the challenges (good for the brain).

Happy Pink Saturday
hop over and visit Beverly at How Sweet the Sound
to find more Pink bloggers. 

May God Bless you richly 


Friday, August 20, 2010

Marianne's Quilt - Part 3


Happy Pink Saturday

Hi!      How are you doing?
All is well here, some work progressing on the quilt.
Are you ready for part 3?

Please feel free to ask any questions, I will do my best to answer them.

Here we go, lots of pictures.......
Today we are going to cut and sew up a set of the corner blocks.
We start by cutting strips of fabric 5 1/4 inches wide.
I have 3 different fabrics stacked, hold down on the edge of the ruler
firmly so that the fabric doesn't scrunch, be very careful
that rotary cutter blade is very sharp, even when it is dull.
 Trim off the uneven edges, make sure the ruler is square.

Turn you strip, so that it is in the right position for cutting
and line up the ruler to cut at 5 1/4 inches.
This is still 3 layers thick so each cut gets me 3 blocks.
 Switching to a smaller ruler for better control, I cut the squares
in half, to create triangles.  You will need 2 triangles for each block
After cutting the triangles, needed, (which I need 4 corner blocks to construct 14 large blocks
and there are 2 triangles needed for each corner block, I will let you do the math).

The next step requires cutting strips of dark blue and aqua.  You need one
9 1/2 x 2 inch strip for ever 2 triangles, no biggy?
But wait, we need to make half of them the dark and half the light color
you will get 4 strips out of a 44 inch strip, so cut (in my case) 13 - 44 inch
strips of each color, then cut that in fourths.  
In the picture above I have 4 strips, you will see why in a few minutes.
The next step is to fold everything in half and press, right sides together.
I have put the aqua strips aside for now, as we begin working with the dark first.
On half of the blocks I will reverse the order of the colors, this will create the weaving of the lattice.
Each large block will have 2 with dark running through and 2 with light.
Clear as mud?  It will become clear in a bit.
See the reason for the pressing, you now have the center of everything and
you can line them up!
Placing right sides together and lining up centers, stitch a 
triangle to the long side of a dark strip, using a scant 1/4 inch.
Be careful not to stretch the fabric, yours will look like the one above.
In my case I need to sew a printed pink to one strip and a dark pink to another.
Next................

You will put another triangle on the other side, like this, keeping the printed
fabrics together and the dark pink together.
Cut, like shown
Now put a printed half with a pink half.
Bring back the aqua strip, that was folded and pressed,
put a print and a pink like shown
Begin sewing each half to an aqua strip, like this.  For my change up
I need to put a print on one side and a pink on the other.
Here is the completed block, do you see how the dark seems to run under
the aqua.  I folded and pressed the block to find the center.
Now it is time to trim the block, to square it.
The reason I needed to find the center is so I could get a true square.
This is a 6 1/2 inch unfinished block, so I need to trim it up (or down) to that
size, once it is sewn into the quilt top it will be a 6 inch block, because each seam is
1/4 of an inch.   So I need to find center to place my 3 1/4 inch mark 
there (click the picture to enlarge).  I also made sure that the 45 degree
marks on the ruler were centered.
Almost done.....
Trim side and top, now turn the block
Line up the cut edges with the ruler markings at 6 1/2 inches, trim.
Here is the squared up block, you have created 2 blocks, now do this again
except reverse the placement of the aqua and the dark blue.
Once you do that you will have.........
These.  So now I need to do this 13 more times.
Of course I have everything cut now, just have to sew them together.

That is it for this time. 
Thank you so much for sticking around, if you have any questions please feel free to ask.

I hope you have enjoyed making these blocks with me.
Please visit Beverly our pink-0-lishish  hostess
for  Pink Saturday over at How Sweet the Sound
and 
Miss Rossie at Fresh Modern Quilts 
our hostess for the Process Pledge.

May God bless you and keep you......until next time.

Friday, August 13, 2010

Marianne's Quilt - Part 2

Welcome to the second installment of  making Marianne's quilt.

I wanted to mention, that I am linking this post to the Pink Saturday
blog Party over at Beverly's How Sweet the Sound
I have been taking part in this fun blog party for several months now.
I have re-routed my post from my Decorating My Tin Shack blog over here
so I can share this pink quilt with everyone. 

Here is the finished block (read part 1 for how I got to this point)
Pretty isn't it!
But there are some problems that will require me to take the block apart
first, it never pays to put the cart before the horse, 
things just do not work out well when you do.
I know the block looks fine, until you begin to look real close.
things are shifted this way and that, not lining up right,
go ahead look close, click on the picture to make it bigger
yep, I got the cart before the horse.
I did not trim my pieces up
I was in such a hurry to see how it would look sewn together.
I do have a tendency  to be a little impatient, 
especially with such pretty fabrics.

 I took, the top and bottom row off and took apart the blocks and trimed them up
and put them back together, being very careful to line things up.
I know it may be harder to see in this picture, but trust me it is alot better.
Why go to all the trouble, because I want to do the best job possible.
Now that I have the mechanics of the block down, and 
I have ironed out the kinks, lets get to the 
the other 14 blocks that will
make up this quilt.

 Cutting begins and sewing begins. 
upper left -center square
triangles for the corners
strips for the middle blocks and 
some of the middle blocks sewn.

So we have 14 blocks, with 4 corner blocks and 4 side blocks,
that is 56 of each to make the 14 remaining large blocks
and to make the 56 small corner blocks I will need 
224 triangles, half in pink and half in fuchsia. 

Today we are going to work on the 56 side blocks
so I cut 9 strips of the aqua and 9 strips of the dark blue fabric
each 1 1/2 inches wide by the width of the fabric (44")
but as always, getting my cart before the horse.  When I cut the 9 strips of pink fabric
which is 5 1/4 inches wide, I cut them to length of 6 1/2 inches.
Why is this not right?
Well, it is ok to do it this way but if one wants to strip piece, one should have left the
strip 44" long. 
Then I could have sewn the aqua strip on one side and the blue strip on the other side of the pink strip
and
THEN cut them to the 6 1/2 inch length, but no not me!

So instead here is how I did it.
I sewed the cut block to the strip of 1 1/2 aqua (I already did the blue but forgot to
take any pictures).  You will note the pile of completed pieces behind the sewing machine,
I did those while I waited for my camera battery to charge.  LOL.
This picture shows you the pieces joined and in the process of pressing.
Press the seams toward the pink.
Some pressing tips.....first do not iron (pressing down hard and sliding iron across fabric)
ironing can stretch you fabric and we don't want to do that, so press please
There is a 'school of thought' that one should press the seam before 
opening it up to press, this is said to set the stitches into the fabric.
Another note:  In quilting we do no open the seams like you would in garment construction
we press them to one side together.
Before pressing.
After pressing.  
I can see a difference, but I do not know if the reason behind it
is important.  I do it because I was taught that way and I feel like I am
skipping a step if I don't do it.  You decide, better yet, tell me if you press first or not.

So now because I got the cart before the horse I get to cut these apart for the third time 
when I could have done it only once.  Sigh.
Cutting these apart is pretty straight forward except that I have to make two cuts
do you see how much more work I made for myself?

I will begin working on the corner blocks next (once I finish cutting the side blocks apart)
lets see if I can keep the cart and the horse in the right order.

Until next time...........

Please go over and visit with Beverly and the other Pink posters at 
and 
head on over to Rossie's for more Process Posts.

May God bless you richly.