Welcome to Big Horn Mountain Creations and Quilting......Quilt Stylist

Welcome to Big Horn Mountain Creations, Quilting and Embroidery.
Custom quilts and embroidery, also longarm quilting service. No two quilts alike, made especially for you. Feel free to contact me if you want a special work of art for yourself.
Grab a cuppa and enjoy the quilts.

Wednesday, February 23, 2011

Turquoise & Brown Split 9 Patch

 Turquoise & Brown Split 9 Patch

it is time to work on my daughters quilt again.

 In October of 2010 I started to work on this quilt
but things have changed a bit  (you can see that here)
if you go and see the orginal beginnings you will find 
that the colors have changed.  

We changed from greens and browns to
turquoise and browns (only one of the original browns made the cut). 
You see I have wanted to make a quilt for her for a long time
but she kept changing her colors, like every 6 months to a year so I waited
and I thought we had it, but once again we changed, 
but this time I think it is a go.  
Besides if she ever wants a quilt  this will have to be it.  LOL
You can visit Samantha @ 
she is working hard on her new home and is sharing
her progress.

Ok back to the quilt.

The pattern is the same, a split 9 patch.
I got the pattern from Quilters Cache  
 
The blocks are 9 inches and we are making a king size.
The new fabrics
Sewing begins....

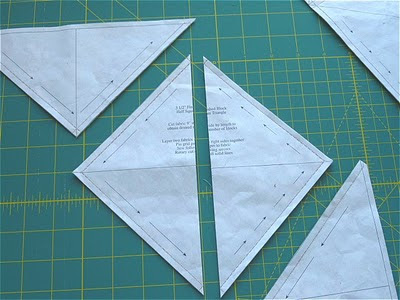
The paper that you see below is so cool.
Normally to do a 1/2 square triangle you cut your
square and then cut it in half again from point to point to 
make a triangle, then you sew it to another 
 triangle of a differing fabric.


Well with this paper, instead you.........
Place two strips of fabric (in this case 9 inches wide)
right sides together, then you pin the paper
in place on top of them like so.
Then you sew on the dotted lines in the direction of the arrows.
Using a very small stitch.  You see two sets of arrows?
This indicates that you have two dotted lines to sew on 
either side of the solid line. 
Once that is done you begin to cut apart the paper on the solid lines

Until you have all of the triangles cut apart
 and when you open it up, you have your square composed of
2 - 1/2 square triangles.  Pretty cool.
Once you press it open you can remove the paper.
The paper removes very easily because you used 
a small stitch and it perforated the paper nicely.
Set one of the triangles are done, with set two awaiting sewing.
Now I have to tell you that my assistant Missy Moew, 
keeps a close eye on my work and helps hold things down (not always what I want her to do).
She also has an opinion on where the pins belong, some she finds 
to intriguing to leave along (I have to watch her closely, she likes
to steal them and chew on them, not a good idea)
She also inspects the needle as I sew (nose up close) and
wants to put her paw in there to play with the needle, needless
to say, she get shooed away.  As soon as the machine starts going
she is in the middle of things.  I don't mind until she 
gets to close to danger.
Set #2 being sewn
and completed
Next up strips cut at 3 1/2 inches, these will be sewn together
in strip sets of 2 each

and then cut at 3 1/2 inches
Once combine you will have
a quilt block
only 131 more to go.
So onward and upward, 

The Rocky Mountain Elk Foundation Quilt was picked up today
the owner won't see it until Friday sometime, but her rep was 
more the happy with the results.
I hope to be able to share with you how it did at auction.

So now we shall work on the T&B quilt for my daughter
I also am binding the quilt for my grandson Codey
I will share that picture soon 
and 
have a hugs quilt on the long arm waiting to be quilted.
It is good to stay busy.

Thank you for visiting and please leave a comment
so I know you came by

May God Bless and Keep you
God Bless America

Sunday, February 20, 2011

A Little Playing Today

 Today, I decided to play a little with
the 
Texture Magic 
I got the other day.
It is put out by Superior Threads
and you can find it at most quilt shops.
 For my play time, I decided on this fat quarter
and drew a design.
 The Texture Magic is white and reminds me of 
lining for a skirt.
I also put batting in between before I did my sewing.
 Here it is sewn, but not steamed
 After sewing you steam (not iron), hold the iron
above the fabric and let the steam penetrate. 

It took about 15 minutes to do the whole thing
 Pretty cool, I think.  
Alot of possibilities with this.
I am thinking it would be a great addition to a
Crazy Quilting project.

Saturday, February 19, 2011

Rocky Mt. Elk Foundation Quilt 11

Rocky Mountain Elk Foundation Quilt

Part 11

The label

My friend Lyn let me use her embroidery machine 
to make this wonderful label.
This is also made on material from one of the shirts
and is a deep midnight blue with silvery blue thread.

I think it adds the finishing touch to the quilt.

Just a couple more things to do
such as tacking down the large embroidered logos
by hand because I did not quilt through them
2 more of those to go.  The binding is all
finished, so we are nearly there.


Thanks for visiting, 
and 
May God Bless and Keep you.

Update:  March 5.   This quilt 
brought $4,000.00 at auction.
A great money raiser for the 
foundation and good pat on the back
for me.  WOW.

Friday, February 18, 2011

Rocky Mt. Elk Foundation Quilt 10

Rocky Mountain Elk Foundation Quilt

Just a little update.  No pictures at the moment.
I was busy stitching down the binding
last night and all of a sudden I came 
to the point where I began.
OH NO!
Now I am going to have to undo some of
the stitches, 
I got so carried away, I sewed down the
area where the label goes!
LOL
The label will be made today, my girlfriend
Lyn is bringing her embroidery  machine over,
so say tuned for pictures of this amazing process.
Then the quilt will be heading to its owner
and off to the auction. 

May God Bless you and keep you safe

Wednesday, February 16, 2011

Rocky Mt. Elk Foundation Quilt 9


 Rocky Mountain Elk Foundation Quilt

 Part 9

Now that the quilting is done
it is time to bind the quilt

After cutting my fabric 1 3/4 inches
I attached it with a 1/4 inch seam.
I chose to do a single layer on the binding,
normally it would be doubled, but with
the thickness of the fabric
I felt it best to do the single layer.
 The binding is sewn to the front of the quilt
and then turned to the back to stitch down by hand.
 Pinned and ready to stitch.  This will take several days
the hand cramps after awhile so breaks are required.

The needle and double thread.
 After stitching
Next up, the label which will go in the last corner


Thank you for stopping by.  It won't be long now
and it will be going to its owners.

May God Bless and Keep you.

Sunday, February 13, 2011

Rocky Mt. Elk Foundation Quilt 8

Rocky Mountain Elk Foundation  Quilt

Part 8

The quilting.

Yes, the quilt is on the long arm
(Saturday morning)
I was so busy quilting I forgot to take any pictures until I was about 
half way done.  LOL.

A close up of the machine during stitching.
Some sections quilted.


All finished and ready for the binding.  A task for tomorrow.
(Sunday)

May God Bless you and Keep you.

Friday, February 11, 2011

Rocky Mt. Elk Foundation Quilt 7

Rocky Mountain Elk Foundation

Part 7


The quilt top is done and ready
to go on the long arm tomorrow.

Click the picture for a close up.

Not much else to tell today
finished up all the borders and
getting the backing ready.

More tomorrow when it goes
on the long arm and we begin quilting.

So what do ya think?
It is good to see my vision come to pass
the top measures 88" X 100"

See you all tomorrow
God Bless and Keep you.

Wednesday, February 09, 2011

Rocky Mt. Elk Foundation Quilt 6

Rocky Mountain Elk Foundation Quilt

Part 6

Welcome back to the progress on this fun quilt
Today I began working on the
3 borders for the quilt
First is a 1 1/2 inch midnight blue
keeping with using the shirts for this quilt
I cut 2 inch strips for the first border this morning
(won't bore you with that process)
and sewed them to the quilt.

Next I began construction of the main border
which is 6 inches wide and incorporates
yokes, sleeves and more blocks.

To begin I cut apart and squared up the 
back yokes from the shirts, no point in having
extra layers of fabric to quilt thorough and 
add weight to an already very heavy quilt. 
 After squaring up the yokes some needed to be added to
(another thing I won't bore you with, besides I forgot to take a picture).
 The sleeves have wonderful embroidery on them and this will go in the border, too
Ready to cut.
 The quilt has become to big to fit across my king size bed
so it is a bit crumpled up.
Now you can see the first border and the lower 2nd border
Remember to click for a bigger picture
 The upper 2 borders, sorry the picture is off kilter, 
I took it upside down, so it would be right side up. 
A close up of the lower border, with a bit of the black fabric that will
be the last border so you can get an idea what it will be like.
Yes, I plan for the one yoke to stay like that into the final border
cool, yes?
Tomorrow I will not be working on the quilt, we have to head 
to town and do some cabinet work.

So stay tuned, I will be back at it on Friday.

Please leave a comment, I love to hear from you all.

God Bless and Keep you.


Tuesday, February 08, 2011

Rocky Mt. Elk Foundation Quilt 5


 Rocky Mountain Elk Foundation Quilt

Part 5

Time to celebrate...........
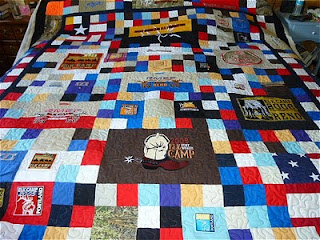
the center of the top is
DONE.

I am pleased with how it looks

What do you think?
 Today's work included,
joining row 3 components together
making the 4th section.
Here we have, the left.
the middle
the right.
 Joining the 3rd and 4th rows together,
then joining the top half to the bottom half.  
WaHoo, and it looks cool.
 Next up are the 3 borders.  So stay tuned

The thread for the quilting and the backing arrived.
Real Tree Camo for the back.  Cool....Yes!

God Bless and Keep you.

Please leave a comment, they mean alot to me, 
I love hearing from you.